Wednesday, June 26, 2013

Throwback Thursday


YES.  Classic.  

1.  I think I'm about 4 or 5 here and I'm already rocking some pink sponge curlers in my hair.  I literally still use sponge curlers to this day.  I've adjusted my technique, obviously.  But I'm nothing if not a creature of habit.

2.  Was there anyone on the planet who didn't own roller skates like this?  They made a cranking sound when you skated and the wheels barely turned.  I suppose that stopped a 4 year old from careening around the neighborhood though.  Apparently, they've modernized them a bit since 1989.

3.  Also I'm skating indoors.

4.  Knee Socks.  

5.  I specifically remember loving this nightgown.  It was totally my favorite and I can even remember the soft jersey texture to this day.  It's not weird at all!  

6.  Check out that wallpaper.  It does not get better than that.  Like yellow palm trees?  Or something?  It matched our yellow formica kitchen table so it was classy.  (I only sorta know what formica actually is).  

7.  Ignore my face. And bangs. 


Tuesday, June 25, 2013

Chocolate Chip Banana Muffins with Honey Roasted Sunflower Seeds

It's been a long time since we've talked about muffins, no?  Like these.  Ok, I'm not counting these because they're cupcakes.  I know it, you know it, we all know it.  But these Chocolate Chip Banana Muffins with Honey Roasted Sunflower Seeds are most definitely muffins.  No debate.  
I whipped these up for my fiancĂ© (that sounds so pretentious) because he is cuckoo for banana muffins.  Also Cocoa Puffs.  Ok, not really.   He could have a package of Oreos at his house and somehow have the will power to eat only one Oreo a day but when it comes to banana muffins, that's his weak spot.  Luckily, I could eat all of the Oreos ever made so we balance each other well.  

Monday, June 24, 2013

June Ipsy Glam Bag


Month two of my Ipsy subscription!  And again I'm incredibly pleased.  These are FULL SIZE products, not some dinky little samples.  Legit peeps.  


Here's this month's aborbz bag.  Leopard and neon.  I want a dress like this or something.  Seems a wee bit smaller than last month's bag but, really, who cares.  


First up, NYX Cream Blush in Orange:  I totally love NYX products and I already own a ton of them but I had no clue they even made cream blushes.  And if I had known, I probably wouldn't have picked Orange for myself.  I was sure it was gonna make me look like a doofus but oh my goodness I love it so much.  It's crazy pigmented but it blends really easily.  And on the cheeks it's more coral-y then orange-y.  Be not afraid.  


Chella Highlighter Pencil:  It's a nude peachy color.  I've recently been using a Rimmel nude eyeliner for my lower waterline (instead of a typical white liner) and love it.  This gives a similar effect but it's smooth and creamy and easy to apply.  I like to use it as a highlighter right on my brow bone or even blend it onto my lid if I want my black eyeliner to pop more.  


Starlooks Lip Pencil in Bare:  I'm still prreettyyy new to lip pencils.  I mostly only use them if I'm applying a really bold color and I want to prevent it from feathering around my mouth.  However, this pencil is a lovely mauvey shade and applies really smoothly.  I'm excited to try this out more.  

J.Cat Sparkling Cream Palette: Take the word "sparkling" very literal.  There is straight-up glitter in this eyeshadow.  When I first saw it, I audibly gasped because I like shiny things.  Then I realized it's not really daytime wearable since I'm no longer 13.  BUT I think it could really be a fun night-time shadow.  If I ever actually went out at night instead of eating Starbursts in my pajamas while watching Vampire Diaries.  
Cailyn Gel Eyeliner in Iron: This stuff is for real.  It's a dark grey color and it would take a lifetime to use everything in that little pot.  It also comes with a built-in brush which are usually pretty low quality but this one is great.  I tested it on my hand when I first got it and this stuff did not smudge ALL DAY. I even showered the next morning and it barely faded off my hand.  Awesome quality.  

Ipsy is really kicking butt lately.  If you're interested in giving it a try, click HERE.  (<< that's my refer a friend link!  If you sign up, they might give me extra goodies in my bag to write about!)

Sunday, June 23, 2013

Weight Loss- Week 3

Here we go, week 3.  

1 pound lost!  

I won't lie, my will power was nonexistent this past week so I was surprised when I saw a loss.  Obviously, I'm happy but it's important to me that I learn ways to cope with boredom or stress or cravings instead of just giving in to the them.  I know that if I want to be successful in the long run, then I have to focus on adopting a healthy lifestyle day to day.  Not just a "diet" now.  

My focus this week is to set boundaries for myself.  My biggest downfall is snacking and luckily, I don't have many options at work to do that.  So I tend to spend the day eating healthy and then I snack when I get home.  So today I stocked up on TONS of fresh fruit and it's sliced and ready to go in the fridge.  

Aside from that, 7:30pm will be my cutoff time.  I tend to eat dinner pretty early and then hit the gym after so 7:30pm seems doable for me.  Setting that deadline means I won't reach for Goldfish crackers after the gym while I watch TV.  Hopefully.

Anyone out there have any other tips for healthy eating?  


Thursday, June 20, 2013

Throwback Thursday

This one is a gem!  It's special for so many reasons.  

1.  My hair is basically bleach blonde on the ends because I was never not underwater in a chlorinated pool for the whole summer.  It's borderline green hair.  

2.  Scrunchy.  On top of my head.  Right where it should be in 1994.  

3.  I'm wearing a bodysuit.  The kind that snapped in the crotch.  Why were those ever a thing and why is American Apparel trying to make them happen again?  Needless to say though, I owned a dozen of them.  

4.  Paint splatter background.  I think I practically begged my mom for this background.  It's just SO COOL.  Almost as cool as the laser background or the brick wall background.  Almost.  

5.  When this picture was taken, I was really heavy into my Dean Cain obsession (he was in his Superman days!) and despite it being really weird that I was 10 and he was about 30, my mom let me send him a letter and ask for his autograph.  So, I offered to trade autographs with him by signing this very picture of myself and sending it to him.  I would give nearly anything to read the letter that I actually wrote him because it would surely be comedy gold but it must have worked because he sent an autograph back! It was the best day of my 10-year old life.   And I'd probz still rank it in my top 5 days of my 28 year old life.  #sortasad

6.  Clearly this was life before braces.  CLEARLY. 

7.  Related: this.

Wednesday, June 19, 2013

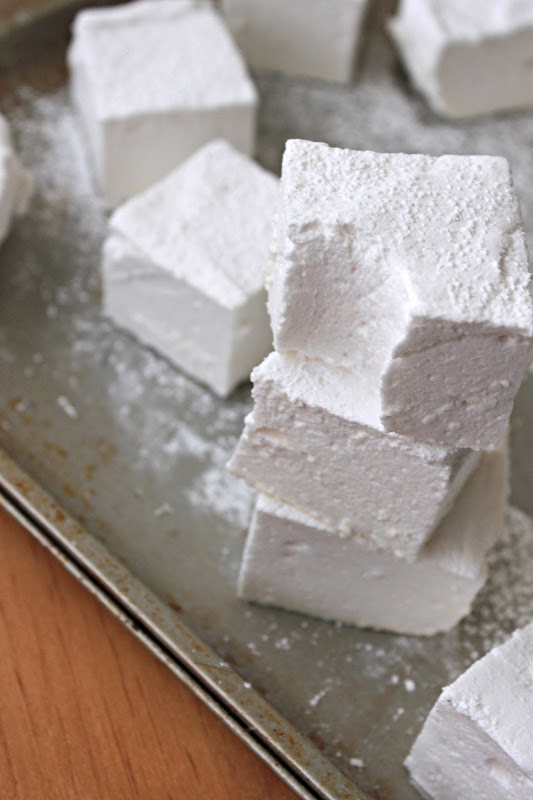
Easy Vanilla Marshmallows


Wanna eat some clouds?  Problem solved, just make these marshmallows.  They are the closest thing to clouds you will ever eat.  

Dang it, I forgot about cotton candy.  Ok, these marshmallows are the second closest things to clouds you will ever eat.  


I've tried making marshmallows (btw, I keep typing "marshamallows" EVERY TIME) about a year or so ago and they turned out just so-so.  I followed the instructions precisely, candy thermometer and all, but they never quite set and the pan I used was too large so they were a bit thin and floppy.  

If marshmallows should be one thing, it's NOT thin and floppy.


So when I saw this recipe on How Sweet It Is, and NO thermometer was required, I was intrigued!  These are quick to whip up and don't require a million hours of setting time so it seemed like a small risk to have a go at marshmallows again.  

I'm so glad I did because otherwise I wouldn't know what clouds taste like!  These were so unintimidating and easy and I was quite shocked at how quickly they came together.  I'm already dreaming up flavor adaptations or other various toppings and coatings to spice these babies up.  


Do coffee marshmallows sound gross?  I think if someone put a marshmallow in my latte I wouldn't be mad at it.  So it stands to reason that putting coffee in my marshmallow would be equally delicious.  IT STANDS TO REASON I said.  

I think I'm getting off course here.  Like I said, if you like clouds but don't have any cotton candy, then eat these marshmallows.  Or something like that.  

Here's the recipe!  

Easy Vanilla Marshmallows

Ingredients
2 packets of gelatin (I use Knox)
8 tablespoons cold water
1 1/2 cups sugar
1/3 cold water
2 teaspoons vanilla extract
1/4 teaspoon salt

Directions
1.  Combine gelatin and 8 tablespoons of cold water in a small bowl.  Stir to combine and set aside.  
2.  Spray an 8x8 inch pan will cooking spray and cover with powdered sugar.  Be sure to cover every inch in powdered sugar.  The marshmallow mixture will be sticky and won't release from the pan unless it's well covered in powdered sugar.  Set aside.  
3.  In a small saucepan, combine remaining cold water and sugar and cook on medium heat, stirring constantly until bubbly and sugar is dissolved (about 3-4 minutes).  Stir in gelatin mixture, stirring until dissolved and bring to a boil.  Once boiling, remove immediately from heat.  
4.  Pour contents into the bowl of an electric stand mixer with a whisk attachment.  Allow to sit briefly to cool slightly.  Add extract and salt and begin beating on medium-high speed for 10-15 minutes or until white, glossy, stiff and thick.  Spread into 8x8 pan and sprinkle with additional powdered sugar.  Allow to sit about 4 hours until slicing (mine were ready to slice even within 2 hours).  To slice, run a knife along the outside of the pan to turn out marshmallows.  Spray a knife or kitchen scissors with cooking spray and slice to desired size.  

Recipe from How Sweet It Is

Monday, June 17, 2013

Top 3 Drugstore Mascaras

This post should come with the disclaimer that my "fave drugstore mascara" is like a revolving door.  I'm ALWAYS trying new mascaras.  It's like a sickness.  I'm such a sucker for packaging and mascara gets me every time.  So, lucky for you, I've wasted tons of money on mascara and I can now be a resource for you!  You're welcome.  

So there are two camps of mascara lovers.  Well, maybe three.  First, people who want volume.  They want thick lashes.  Second, people who want length.  They want fluttery feminine lashes. And third, people who want both.  They want it all.  


Obviously, I'm in the third camp.  I want it all.  I want the biggest lashes you've ever seen.  I basically wanna look like a drag queen.  I think I will forever be in search of my one true favorite mascara but in the meantime, I've found a few that I really do love.  


I think this mascara probably does the best job of adding length and volume.  It's super black and I never had a problem with it smudging throughout the day (and I ALWAYS have problems with smudging).  And maybe I'm imagining it but I think it gives my lashes the slightest curl.  

Next up is the Revlon Lash Potion


I bought this one 100% because of the packing.  So pretty!!  And the first time I used it, I actually hated it!  I decided to give it another try a few weeks later and I'm glad I did.  Maybe the formula needed to dry out a bit but this mascara is great for length.  I'd categorize it as the "fluttering feminine" kind of lashes.  Plus, I can apply a few coats and it never clumps.  

Last is my newest purchase, Maybelline The Rocket.  


I mean hello, look at this tube.  Obviously I needed it.  This formula is probably the blackest black I've tried and it really adds crazy length and decent volume.  However, I have noticed some smudging on my upper lash line (just my right eye oddly).  But, again, it never clumps which makes application easy.  

Welp, I somehow managed to talk about eyelashes for 5 or 6 paragraphs.  Worth it.  What are your faves?

Sunday, June 16, 2013

Weight Loss- Week 2

Drumroll.....

1 pound lost!

Now I'm heading in the right direction!  I'd love to see that number at 1.5 or 2 pounds per week so I'm hopeful I can make that happen.  

I think the biggest thing I learned this week was to actually listen to my own stomach and stop eating when I'm, ya know, full.  Groundbreaking concept, right?  But sadly, I sometimes didn't listen to my own stomach.  If something tastes good I'm pretty happy to clean my plate.  Stopping when I start to feel full has made me realize I can still eat things I really love but just in moderation.  

So my focus this week is:

1.  Healthy snacks.  Berries are affordable these days I could probably live off of raspberries for the rest of my life so I'm stocked up on healthy snacks this week.  

2.  Hydrate!  I'm usually insanely good at drinking plenty of water all day at work but weekends and weeknights are a different story.  I want to stay hydrated from morning to night.  


Wednesday, June 12, 2013

Junk Food Cookies


I had different intentions for these cookies but I sorta lost my focus in the store.  Before I knew it, I was walking out of the store with a hodge podge of things that sorta made sense together?  But, I soon learned, that if you bake most things together with flour and butter, then it definitely makes sense.  Life lesson!  


I think my favorite part of the cookie is the Snow Caps.  I originally wanted the mini Snow Caps but the big ones were on sale and saving money trumps everything else ever for me in life so I opted for the big ones.  What a happy happy mistake.  They created the most delightful pockets of gooey dark chocolate.  Tah' die for.  


And we're all on board with potato chips in cookies right?  It's like, so last year.  So if you haven't tried it then get with it people!  It's not like I'm asking you to use a BBQ Potato Chip or something.  Regular potato chips just add a crunchy salty kick.  Speaking of kicks:  


 I had to. 


Anywayzzz, these cookies are really what you make of them.  I like a little bit of everything so I have pretty much a little bit of everything in there.  But if you've got a favorite candy, swap it in!  Make happy mistakes!

Here's the recipe!  

Junk Food Cookies
Yields approximately 18 cookies


Ingredients: 

2 cups plus 2 tablespoons flour
1/2 teaspoons baking soda
1/2 tsp salt
12 tablespoons of unsalted butter, melted and cooled
1 cup brown sugar
1/2 cup sugar
1 egg plus 1 egg yolk
2 teaspoons vanilla extract
3/4 cup crushed potato chips
1/3 cup chocolate covered peanuts
1/3 cup crushed pretzels
1/2 cup mini peanut butter cups
1/3 cup Snow Caps

Instructions: 
1.  Preheat oven to 350 degrees.  Line two baking sheets with parchment or silicon mat.  Set aside. 

2.  Mix the flour, baking soda, and salt in a medium bowl and set aside. In another bowl, whisk the butter and sugars until the sugar is dissolved and the mixture is glossy. Add the egg, egg yolk, and vanilla and stir until mixed. Gradually add flour and mix until a dough forms (it may look crumbly at first, but it will come together)  Fold in the chips, pretzels, peanuts, peanut butter cups and snow caps.

3.  Scoop dough, about 2 tablespoons in size, and place on baking sheet, leaving about 2 inches between cookies.  Bake for 12-15 minutes or until the edges are slightly brown. The centers should be soft and look slightly underdone.  Do not over bake!  Let cool about 3-5 minutes on the cookie sheet before transfering to a wire rack to cool completely.  

Enjoy!  

Recipe adapted from How Sweet It Is.  


Sunday, June 9, 2013

Weight Loss- Week 1

Moment of truth, ya'all.  It's week one of my weight loss goal.  And the update so far?  

I gained a pound.  

Wah wah.  Yeah, I did the opposite of what I wanted to do.  

So in general,  it's totally normal for my weight to fluctuate a pound or two in a week depending on when I weight myself and what I'm wearing so it doesn't concern me much.  However, when my main objective is to actually, ya know, lose weight, it's a bit of a bummer.  

So here's what's learned so far:

1.  Unless I live in a vacuum of healthy choices and no social life, figuring out a balance between being active and healthy and actually enjoying an adult beverage with some friends now and then is crucial.  So I really need to eat the best I can 80% of the time so that I can have some indulgences the other 20% of the time.  

2.  I've gotta set mini-goals along the way!  While I've got my main 25lbs as the ultimate goal, I think making small goals along the way is a good way to stay motivated.  So, I've been eyeing some high-end eyeshadow palettes that I keep talking myself out of.  I have plenty of makeup and I usually stick to drugstore stuff.  BUT with my first 10lb loss will, I'll let myself buy a quality eyeshadow palette, no guilt!  The reward for the full 25 lbs will be this beauty.  I've been wanting it for YEARS but never pulled the trigger.  When I hit 25lbs lost, that sucker is all mine.  

So that's that.  I never want to use the word "gained" on a post like this again.  That was brutal.  My focus this week is on my 80/20 while I map out a more diverse workout schedule for myself.  

Stay tuned for another update next week!  

Monday, June 3, 2013

S'mores Pie

Uh yep. Smore's are the best, yes? I will answer for us all. Yes, they are. I'm a sucker for anything s'mores. If it involves melted chocolate and ooey gooey toasted marshmallow, I have probably eaten it.
I'm actually realizing this year that s'mores are apparently a summertime thing?  I see s'mores recipes and references popping up all over my favorite blogs these days.  I think my brain is reversed because smore's were always an autumn thing to me.  I envision high school football games and bonfires and sweaters and boots.  Apparently my childhood was a sham!  I should have been eating smore's in summer! 

Although let's be real, I never ate s'mores by a bonfire after a football game in autumn anyway.  It's not like I grew up in Dillon, TX.  Heck knows I wish I did.  Coach Eric Taylor, will you marry me?
I mostly just ate s'more by sticking a marshmallow on a fork and holding it over the burner on the stove.  And I pretty much did that any time of the year so I have no clue where I came up with that whole autumn scenario.   

Annyywwaayz, back to this pie, mkay?  I spotted this on Sprinkle Bakes awhile back and was immediately obsessed.  I kept putting off making it because pies are tricky to transport and I certainly don't need to keep a full pie at my home because it won't remain a full pie for long.  But enough was enough and I decided to go for it.  
And holy crap.  #1 It was crazy easy to make.  #2 It tastes like a s'more so it's obviously delicious.  #3 It's got a real stage presence.  It looks impressive.  It's a facade, people.  It ain't complicated.  Of course, Sprinkle Bakes' version is basically a work of art that belongs in a museum.  But I think mine holds its own.  

It's a new summertime (?) classic!  

Here's the recipe!  

Smore's Pie

Ingredients

Crust
1 1/4 cup graham cracker crumbs
1 tablespoon sugar
pinch of salt
1/2 cup butter, melted

Ganache
2 cups heavy cream
18 oz semisweet chocolate, chopped (I used chips) 

Marshmallow Meringue
3 egg whites
1/2 teaspoon vanilla extract
pinch of salt
1/4 cup sugar
1 7oz jar of marshmallow creme (like Fluff)
2 1/2 cups mini marshmallows

Directions
1.  Whisk together crumbs, sugar and salt in a medium bowl.  Add melted butter and stir until the mixture is damp and course, like wet sand.  Firmly press into the bottom of a 9 inch springform pan and set aside.  

2.  To make the ganache, heat the cream in a medium saucepan over medium-high heat until very hot but not boiling.  Remove from the heat and pour in the chocolate.  Let it stand for about 3 minutes and then whisk until all the chocolate has melted and the mixture is smooth.  Pour the mixture over the graham crust and refrigerate at least 2 hours until set.  (I stored mine in the freezer to speed up the process). 

3.  To make the Marshmallow Meringue, using a stand mixer, beat the egg whites, vanilla and salt at high speed until foamy.  Begin adding sugar 1 tablespoon at a time until stiff peaks form.  

4.  With the mixer still on, add 1/4 of the marshmallow creme until incorporated.  Repeat until all creme is added.  Mix on high until meringue is light and fluffy.  Fold in mini marshmallows with a rubber spatula.  

5.  Once your crust and ganache is set, you can heap the meringue in the middle of the pie and begin swirling to evenly coat the surface of the ganache.  I didn't use the entire batch of meringue, but almost all of it.  Brown with a kitchen torch (or brown using your oven's broil setting paying close attention so the meringue doesn't burn).  

6.  Refrigerate to store and allow to come to room temperature when you're ready to serve.  

Enjoy!  

Recipe barely adapted from Sprinkle Bakes  
            

Sunday, June 2, 2013

May Ipsy Bag


On the advise of my friend Maggie, I decided to give another subscription box a try.  I've been receiving Birchboxes for a few months and I've found that they're hit or miss.  Occasionally I find something great but every box has a few duds.  

So this is my first Ipsy Glam Bag and WOW.  I'm blown away by the quality of the products and the shear size of the "samples."  I'm totally in love.  Plus, they come in a reusable makeup bag.  Ipsy for the win!  

 So this is the bag I got and it's the perfect size to hold all my makeup odds and ends and then throw in my purse.  I have a few lip glosses, some oil blotting sheets, a mini mirror and the roll-on perfume in there.  Adorbs.
 People, I got a FULL SIZE Zoya nail polish.  This would usually retail for about $8 on its own (and the subscription is only $10 a month).  It's a beautiful light pink color with a slight shimmer and it's perfect for summer.
This is the roll-on perfume called Pacifica in the scent Tahitian Gardenia.  It certainly has a floral scent with maybe a touch of citrus?  It seems light and summery so it's perfect to keep in my purse and apply later in the day as a freshen-up.
 This is a nearly full-size lipstick by Mirabella called Bellarina and it's a gorgeous light pink with golden undertones.  It's somewhat shear but adds a bit of shine and would be a great color to keep in my purse (can you tell I keep everything in my purse?) and apply throughout the day.  

I've only just started "styling" my brows and I've yet to use up my trusty Maybelline Clear Mascara but this Anastasia Clear Brow Gel is a great size for traveling since these days I can't stand to leave the house without taming these beasts above my eyes.   


When I first got this little thing I didn't actually know what it was.  Turns out, it's concealer!  The consistency is silky smooth and the coverage seems decent.  I'm actually still madly in love with my NYX HD Concealer in Light  but, again, this Yaby concealer is the perfect size to keep in a travel bag for brief getaways.  

All in all, I'm super super pleased with my Ipsy Glam Bag.  So much so, that I'll likely cancel my Birchbox and just stick with Ipsy.  I'm definitely a sucker for these subscription bags but with Ipsy, I think I really got my $10 worth. 

If you're interested in subscribing, check it out here  (<<that's my refer a friend link so you'll be giving me points towards purchases!)