1. To make more bread! I will enter 2013 with abandon and attack yeasted bread with fervor. It's about to get very real in my City Kitchen. Bagels won't know what hit 'em.
2. To make macarons! Macarons have terrified me for years. They're just so beautiful. I shy away from their beauty. And they're finicky as the dickens. And they're French! A trifecta for fear. But this year I FINALLY have the kitchen supplies and maybe the confidence to pull them off.
3. To blog more! I've lately made a commitment to myself to blog more and I'm happy with my progress. But I want to make 2013 bigger and that means more content and more frequent blogging. Get ready to love me more than you already do. If that's possible.
4. To run farther! These last few weeks I've made some great progress in the direction of my health goals (though I dearly miss refined carbohydrates sometimes) and I want 2013 to bring more of the same. This means running farther, planking longer and saying no to pretzel M&Ms.....sometimes.
5. To knit! Or crochet! Or play ukulele! Or learn to speak Spanish! What I mean is, I have many many hobbies and skills I've wanted to hone for quite awhile. But money and time and resources have always been tight. But no excuses in 2013. I'm a smart gal and I can teach myself to knit if I want to dagnabbit! So 2013 is not only when I begin projects, but also when I actually finish them.
6 To be my best me! Specific, right? The thing is, I tend to be my own worst critic. It's not to say I'm not proud of what I accomplish but I generally find my accomplishments to fall short of my own expectations. So being my best me not only means to fully dedicate myself to things that are important to me but it also means being my own cheerleader. Perfection isn't everything and sometimes a cup of tea and a deep breath is a little necessary self-care.
What are your resolutions?

Monday, December 31, 2012
Sunday, December 23, 2012
Salted Caramel Toffee Peanut Fudge

No time. Must post. People! This fudge is coming to you late. I offer my sincerest apologies. But I really had to start my Christmas shopping at some point (like 3 days before Christmas) so time for posting became increasingly harder to find this week. But I finally found it!

But good news! This isn't typical fudge that requires thermometers and babysitting. It's also not this kind of fudge that requires babysitting. Zing! Man, I'm good.

This fudge is made by melting the good stuff (sweetened condensed milk and chocolate) and topping it with more good stuff (toffee, peanuts, sea salt) and eatin' it. It just needs to chill in the fridge for 30 minutes while you chill on Pinterest for 30 minutes and you got yourself some fudge.

And here's the biggest confession of all. I was pretty confident that I kinda hated fudge. It's like, when my brain is ready to receive chocolate in my mouth and I eat fudge, it's always a let down. I'm expecting a different chocolate intensity. But when I saw this recipe, the world was ok again.

This is fuddggggeeee. It's everything you want it to be. And it's ok to eat it before 8am, if necessary. IT WAS NECESSARY GUYS. So do whatcha gotta go this Christmas but please make this fudge part of it. You're very welcome.
Ingredients:
20 ounces semi-sweet chocolate, chopped (I used chips here because I'm lazy)
1 (15-ounce) can sweetened condensed milk
1 teaspoon vanilla extract
10-12 caramel-filled chocolates (I used Ghiradelli squares with salted caramel), chopped
3/4 cup chocolate toffee pieces, like Heath toffee chips
1/2 cup dry roasted peanuts, chopped
4 ounces milk chocolate, melted
sea salt, for sprinkling
2. Add semi-sweet chocolate to a double boiler, and melt completely. One melted, remove from heat and slowly add in sweetened condensed milk and vanilla extract, stirring with a spatula until completely incorporated and the mixture becomes very thick. Use the spatula or a large spoon to spread the chocolate in the pan, coaxing it into corners. Don't worry about the top looking smooth because it will be covered with chocolate and candies, just spread it evenly. Place in the fridge for 10 minutes to set.
3. Melt the milk chocolate in the microwave at 30 second intervals until smooth. Remove the pan from the fridge. Take a few small spoonfuls of the milk chocolate and using the back of a spoon, spread it evenly over the top of the fudge. Immediately sprinkle with a little sea salt and cover it with the chopped caramel-filled candies, peanuts and chocolate toffee pieces. Using a little pressure, press the toppings into the fudge to set. Take remaining milk chocolate and drizzle it over the top to set some of the loose candy. Let set in the fridge for 30-45 minutes.
4. When ready to cut, fill a large cup with hot water. Dip a sharp knife into the water, then blot on a towel. Use knife to cut fudge into your desired size of squares. I recommend small pieces since this fudge is rich.
Enjoy!
Instructions:
1. Spray an 8×8 pan with non-stick spray and set aside.
2. Add semi-sweet chocolate to a double boiler, and melt completely. One melted, remove from heat and slowly add in sweetened condensed milk and vanilla extract, stirring with a spatula until completely incorporated and the mixture becomes very thick. Use the spatula or a large spoon to spread the chocolate in the pan, coaxing it into corners. Don't worry about the top looking smooth because it will be covered with chocolate and candies, just spread it evenly. Place in the fridge for 10 minutes to set.
3. Melt the milk chocolate in the microwave at 30 second intervals until smooth. Remove the pan from the fridge. Take a few small spoonfuls of the milk chocolate and using the back of a spoon, spread it evenly over the top of the fudge. Immediately sprinkle with a little sea salt and cover it with the chopped caramel-filled candies, peanuts and chocolate toffee pieces. Using a little pressure, press the toppings into the fudge to set. Take remaining milk chocolate and drizzle it over the top to set some of the loose candy. Let set in the fridge for 30-45 minutes.
4. When ready to cut, fill a large cup with hot water. Dip a sharp knife into the water, then blot on a towel. Use knife to cut fudge into your desired size of squares. I recommend small pieces since this fudge is rich.
Enjoy!
Recipe barely adapted from How Sweet It Is
Wednesday, December 19, 2012
My Christmas Wish List
Dear Santa,
I really really really really need:
1. Canon EF 50 mm f/1.8 lens
 It's for the fans really! Better lens means better picture. #selfless
2. Cuisinart Food Processor
 Or any food processor really. How dare I call myself a food blogger and not have the ability to finely chop ingredients with the use of an electric gadget? It's embarrassing really. Also, unrelated, I NEVER spell "embarrassing" right the first time.
3. NuMe 4-Play Curling Wand set:

This is everything. It's just everything. This set will make my hair look like hers. And if all I get out of life is hair like hers, maybe I'm ok with that. Admittedly, this costs more than I would ever really spend on a heat styling tool but that's why I'm asking for it from Santa.
4. All the cookbooks
Just all of them. Don't make me pick. Ok fine, I'll pick a few:
Momofuku Milk Bar
Bouchon Bakery
Simple Food, Big Flavor
DIY Cookbook
So if I had to pick, I'd want those. Plus all the other ones.
5. Sigma Beauty Brush Collection

Lol, right? $150 for makeup brushes! But I'm creating this list with the idea that money is of no matter. Well actually, if it were really of no matter, I'd have some Italian villa on this list or my dream kitchen or an apartment in London or a beach house in Hawaii. So, in my imaginary world, I just want things that are slightly out of reach financially so they feel conceivably achievable but sorta aren't achievable and I can always feel a little bit let down for not getting things that are slightly out of my reach. Good strategy, eh?
That's all I need. These 5 things plus a vacation and a spa day and someone whose willing to pay me to blog and bake all day. K, thanks Santa!
I really really really really need:
1. Canon EF 50 mm f/1.8 lens
2. Cuisinart Food Processor
3. NuMe 4-Play Curling Wand set:
This is everything. It's just everything. This set will make my hair look like hers. And if all I get out of life is hair like hers, maybe I'm ok with that. Admittedly, this costs more than I would ever really spend on a heat styling tool but that's why I'm asking for it from Santa.
4. All the cookbooks
Just all of them. Don't make me pick. Ok fine, I'll pick a few:
Momofuku Milk Bar
Bouchon Bakery
Simple Food, Big Flavor
DIY Cookbook
So if I had to pick, I'd want those. Plus all the other ones.
5. Sigma Beauty Brush Collection
Lol, right? $150 for makeup brushes! But I'm creating this list with the idea that money is of no matter. Well actually, if it were really of no matter, I'd have some Italian villa on this list or my dream kitchen or an apartment in London or a beach house in Hawaii. So, in my imaginary world, I just want things that are slightly out of reach financially so they feel conceivably achievable but sorta aren't achievable and I can always feel a little bit let down for not getting things that are slightly out of my reach. Good strategy, eh?
That's all I need. These 5 things plus a vacation and a spa day and someone whose willing to pay me to blog and bake all day. K, thanks Santa!
Monday, December 17, 2012
Chocolate Covered Pretzels

Like these really even need a recipe. Pretty simple: chocolate. pretzels. mouth. And that's the recipe. I present them to you as an idea, really. A reminder, perhaps. Why not make them as a quick, no bake option for Christmas?

For me, chocolate covered pretzels are especially Christmasy and it's not just because of the pretty sprinkles. Growing up, every year my family and I would visit downtown Chicago during Christmas time. We'd see the lights, go out to dinner (at "D.B Kaplan's" where they had a sandwich called an "Ike and Tina Tuna") and visit the HUGE FAO Schwartz store on Michigan Ave. It was magical. FAO Schwartz is now an H&M, by the way. (<< not complaining).
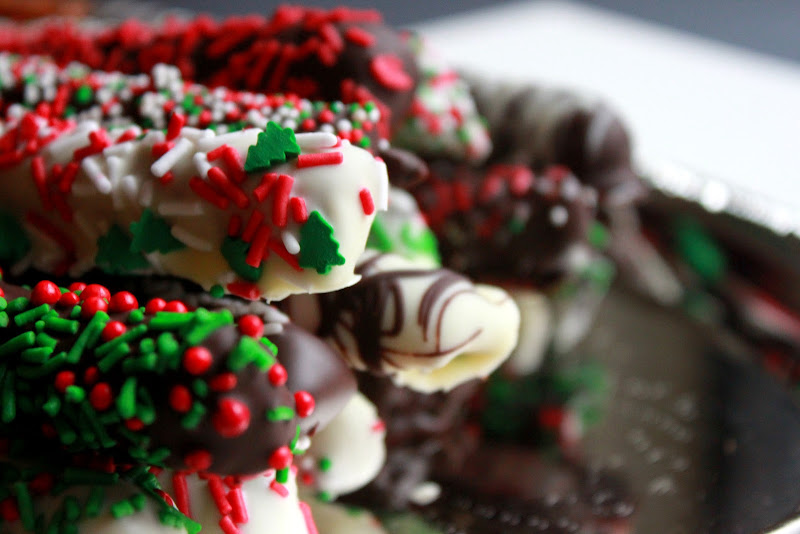
But we always ended the night with a chocolate covered pretzel that we'd eat on the way home. It became a tradition but was really born out of necessity. My parents, not ones to waste money, needed their parking validated. So we found the least expensive place in the Bloomingdale's mall, what I remember to be a weird safari store that sold chocolate-covered pretzels for some reason, we'd all chose a pretzel and eat it on the ride home.

And so I always just associated chocolate-covered pretzels with Christmastime. Did I warm your heart with that story? It was all made up. KIDDING. That was real life and making chocolate covered pretzels every year at Christmas is real life too.
So I recommend you make this a holiday tradition too. Whether you need your parking validated or not.
Here's the recipe!
Ingredients:
package of long pretzel rods
Baker's Semi-sweet chocolate
Baker's white chocolate
assorted sprinkles, chopped nuts, etc.
Instructions:
1. Melt the chocolates in separate double boilers until chocolate is completely melted and smooth. Remove from heat.
2. Create an assembly line with the 2 bowls of chocolate, your choice of toppings, and a baking tray lined with tin foil.
3. Using a spoon, spoon the chocolate over the pretzel, leaving a few inches bare as a "handle." Allow the excess chocolate to drip off the pretzels by twisting and wiggling the pretzel. This will help to avoid the chocolate pooling under the pretzel or into the toppings. Check out the (weird) technique I used:
4. Immediately cover chocolate with desired toppings and place on foil-lined baking sheet. When the sheet is full, place it in the freezer to set for about 10 mins.
5. Once set, they're ready to be served or kept in an air-tight container for a few days.
Enjoy!
Sunday, December 16, 2012
My Week in Instagram

Working clockwise from top left
Masquerade Holiday Party! It's that time of year again when my coworkers and I put on dresses and heels and drink a little too much and eat some chicken McNuggets afterwards. These lovely ladies are Maggie and Angelica and they look simply ravishing in festive masks. The night got a little blurry after this....
Scotcharoos: This was actually round two of Scotcharoos. Round one I messed up with some amateur move by boiling the sugar too long. This was sweet redemption.
Recipe Testing! This afternoon of recipe testing may have left me with a few duds but it definitely made me realize that if I had the time and resources, I would gladly test and develop recipes a lot more. I'm still convinced I can make Gingerbread Smore's Cups work. Just give me some time!
Carbs: After the holiday party, I needed carbs in a very serious way. I've actually been eating a lot less carbs lately (aside from all the baking, obvi) and I'm afraid that going carb-crazy this weekend opened the flood gates again. They're like a drug. Once those salty starchy french fried hit my lips, all hope was lost. I just need my fix, man.
Goat cheese: But don't worry about all the carbs because I followed it up with a veggie burger on a salad! This was really a practice in self-restraint because I could have ordered this burger on a pretzel bun. And Ann Lindsay has never said no to a pretzel bun. But in reality, this salad existed solely as a vehicle for goat cheese to my mouth. Mission accomplished.
And a follow-up! So remember when I entered a contest? Something tragic has happened. I lost. So obviously I'm devastated. And I'm fully willing to admit that I'm a sore loser. Always have been, always will be. It's the reason I rarely enter contests. But my jealously, resentment and sadness don't really manifest themselves in any real way. It's not like I'll take revenge on the winners. I wouldn't even know how to do that. How would I do that? If you could suggest a way to exact revenge, what would you recommend? Hypothetically, obviously.
So anyway, the winner received an iPad which is fine because I don't really want one. They're overrated, probably. I don't really know, cuz I don't have one. And never will. Because I lost. I'M TOTALLY FINE WITH IT.
Thursday, December 13, 2012
DIY Cake Stand
Pinterest is both an enemy to productivity and a catalyst for it. It's like Dr. Jekyll and Mr. Hyde. I love it and hate it. We're hot and cold. We're frenemies. You get what I'm sayin'?
Because Pinterest simultaneously makes me feel inadequate because of my poorly decorated apartment and mediocre makeup skills but also leads me to believe that I can make anything for $2 and have six pack abs. (<< not that naive). I'm a constant roller coaster of emotions.
Just when I think I'm wasting my time looking at kitchens the size of my whole apartment, I find a little gem like a DIY Cake Stand Tutorial. The world's ok again. I can do this, guys. You can too. Clear eyes, open hearts, can't lose. I've been watching too much Friday Night Lights.
Let's begin. Your tools:
 Acrylic Paint and Gloss Varnish. I used the cheap stuff. I believe these were on sale at Michael's for less than a dollar. Some acrylic paints even have the gloss built into the formula. Save yourself a buck and buy that kind. Don't be a sucker like me.

Craft glue and sandpaper. Now, I know nothing about this glue. But the package said it works on ceramic, wood, glass and a bunch of other stuff so I went for it. And sure enough, it worked!

Paintbrushes! Also the cheap kind. Are you sensing a trend here? I had these on hand for several other projects but they sell them cheap at Michael's. You can really get away with using one brush here, especially if your paint has a built-in gloss.
 Plain ol' terra cotta plate. This is 9" inches and cost about $2. God bless Michaels.
 Candlestick. Now, I had to do a little something weird because you'll notice the top of this candlestick had a brass ring that I was afraid would keep the plate off balance. So I found some weird hollow wooden thing that I glued on top of the candlestick to make a flat surface. Clearly, I love over-complicating things so if you were smart, you'd just find a flat candlestick. Of course, cheap materials here too. Probably about $3 total.
Because I was using a wooden candlestick, I sanded it down just a bit to make sure it was easy to paint. Then paint!
 I did two even coats of color, waited for it to dry, and then did one coat of gloss. When the gloss is dry, you can glue the candlestick to the the center of the plate, with the lip of the plate facing downward (see pics below). I wasn't suuppperr precise in centering the candlestick but everything turned out just fine. You probably don't want your cake toppling over so just take a little time to make sure the candlestick is as close the the center of the plate as possible. I then let the plate sit face down while the glue cured.
Because terra cotta and wood are pretty porous, the glue cured within about 2 hours. However, it certainly wouldn't hurt to even let it cure overnight, especially if you decide to use different materials.
And voila!
 Your cake stand is ready to have apples stacked on it for some reason! Overall, this was an inexpensive and easy project and I'm super pleased with the results. Once painted, you can't tell the difference between the terra cotta and wood and this has opened the doors for a lot of variations.
So have at it gurl! Thanks Pinterest!
Because Pinterest simultaneously makes me feel inadequate because of my poorly decorated apartment and mediocre makeup skills but also leads me to believe that I can make anything for $2 and have six pack abs. (<< not that naive). I'm a constant roller coaster of emotions.
Just when I think I'm wasting my time looking at kitchens the size of my whole apartment, I find a little gem like a DIY Cake Stand Tutorial. The world's ok again. I can do this, guys. You can too. Clear eyes, open hearts, can't lose. I've been watching too much Friday Night Lights.
Let's begin. Your tools:
Craft glue and sandpaper. Now, I know nothing about this glue. But the package said it works on ceramic, wood, glass and a bunch of other stuff so I went for it. And sure enough, it worked!
Paintbrushes! Also the cheap kind. Are you sensing a trend here? I had these on hand for several other projects but they sell them cheap at Michael's. You can really get away with using one brush here, especially if your paint has a built-in gloss.
Because I was using a wooden candlestick, I sanded it down just a bit to make sure it was easy to paint. Then paint!
Because terra cotta and wood are pretty porous, the glue cured within about 2 hours. However, it certainly wouldn't hurt to even let it cure overnight, especially if you decide to use different materials.
And voila!
So have at it gurl! Thanks Pinterest!
Monday, December 10, 2012
Mint Chocolate Crunch Cookies
I am entering these Mint Chocolate Crunch Cookies in the Creative Holiday Recipe Contest hosted by Confessions of a Cookbook Queen and Cookies and Cups!

So let me tell you the harrowing story of this cookie. Get your tissues ready. I heard about this contest on one of the many baking blogs I follow and I was immediately pumped. I feel like I'm finding my voice when it comes to blogging and I'm slowly developing my style. It seemed like the perfect opportunity to possibly get my blog to a wider audience AND challenge me to come up with a recipe that fit the requirements: Creativity, Use of Ingredients, and Ease of Preparation.

So I racked my brain to come up with a recipe that I thought would be a breeze to whip up but still had a little something special. Then I thought, "Well I sure love cookies. I wish I could eat three cookies at once. Take that society!" And so this cake mix cookie came to be. I was SURE that this was a fun, original idea. Then this happened the next day. And this happened a few days later. And my poor little heart broke.

Just as I was gleefully passing around these cookies to my coworkers the next day, my silly smile left my face when I sat at my computer and saw my "original idea" was barely original. I almost decided to not post the recipe at all because I was so darn discouraged that someone had the same idea as me and beat me to the punch. But the heck with 'em! Cuz I've got gumption! Or something.

This recipe was too delicious not share with my reader(s) anyway. So with my head held high, I present my Mint Chocolate Crunch Cookies! Give them a shot. And give me credit please?
Here's the recipe!
Ingredients
1 box 18.25oz chocolate cake mix
2 eggs
1/3 cup vegetable oil
2 Tbsp milk (if necessary)
approximately 15 peppermint patties
approximately 15 grasshopper cookies
sugar, for rolling
Instructions:
1. Preheat oven to 350 degrees. Line cookie sheets with parchment or silicon baking mat and set aside.
2. In a medium bowl, combine cake mix, eggs, and oil until dough forms. If necessary, add milk if the dough seems dry.
2. Stack patty and cookie, and on either side, add one tablespoon of dough (see picture above). Use your fingers to meet the dough around the edges of the patty and cookie, making sure to create a seal. Lightly roll in granulated sugar and place on baking sheet, about 2 inches apart.
3. Bake 8-10 minutes until center is puffed and edges are set. Allow to cool 5 minutes on the tray before moving to a wire rack to finish cooling.
Enjoy!
An Annie's City Kitchen original
Sunday, December 9, 2012
My Week in Instagram

Working clockwise from top left
Christopher Kimball! Just livin' the dream guys. My sis and I went to a book signing by the Christopher Kimball of America's Test Kitchen. It was accompanied by a presentation and Q&A session, and aside from a few weird questions by the audience (such as "Do you take your wedding rings off when you're working with your hands?"), it was just as magical as it sounds.
Painting and Movies: My sis and I bought some inexpensive miniature houses from Michaels (about $4 apiece), pulled out my giant stash of cheap acrylic paints and watched Home Alone while we painted. Obviously I chose the "bakery." It was relaxing and Christmas-y and it's likely I'll paint a whole village before the season is over.
Fraggle Apron! My love for Fraggle Rock (and all things Jim Henson) could warrant a blog all it's own so it's putting it mildly to say I was excited to receive this adorable apron in the mail as a birthday gift from my little sis. She really knows the way to my heart- through the kitchen.
Birthday Dining: As mentioned, I celebrated a birthday recently and all you need to know is that I'm over 21 and under 30. No further details will be provided. However, I had a lovely lunch with my sis and the BF (including wine at lunch, which is the best ever), then I caught a matinee for the Twilight movie, went shopping and went for a run at the gym. Sorta a perfect day. It seems only right that wine should always be had at lunch.
I love Instagrammin' (just made that a verb) and you can follow me at AnnCLindsay. Stay tuned next Sunday for more riveting details of my life! I hope you can handle the suspense.
Thursday, December 6, 2012
Cranberry Cocoa Galette


So does it go without saying that I totally cheated on this one and used store-bought crust again? I think you can just assume that's what I'm always doing at this point. It's not that I don't enjoy time spent in the kitchen (I'd be way off course with a baking blog if I didn't enjoy it), but some nights I can't commit to the the kind of time needed for a homemade crust. I mean, who will watch all the TV?! Think of the TV!

And what's even lazier about this galette is that cranberries don't need any peeling, coring or chopping. I think I had this baby in the oven within 5 minutes. I think I'll start only using fruits that require no preparation now. So that leaves me with blueberries, blackberries, raspberries and..... peas? Maybe not my best idea.

However, being that most of my experience with cranberries growing up was canned and cylindrically shaped, I still like to think this is quite a sophisticated dessert. It's just subtly sweet with a bite from the cranberries and cocoa. Sprinkled with a little powdered sugar, it practically screams Christmas. Or, "cheater!" with the pie crust and all.
Here's the recipe!
Ingredients:
1 round of store-bought pie crust (or use your favorite recipe!)
2 cups fresh cranberries1/2 cup unsweetened cocoa
2/3 cup sugar
1 tablespoon cold salted butter, cut into small pieces
powdered sugar, for dusting
Instructions:
1. Preheat oven to 375 degrees. Line a baking sheet with parchment or a silicon baking sheet and set aside.
2. In a medium bowl, combine the cranberries, cocoa, and sugar. Stir to coat berries.
3. Unroll your dough onto the baking sheet and pile the mixture into the center of the dough, leaving about 2 inches around the perimeter. You may have just a bit of the mixture leftover (I did). Working your way around the dough, overlap the dough and pinch together until you've formed a tight parcel for the berries (see pictures above).
4. Dot cubes of butter over the top of the cranberries. Bake for 40 minutes, turning the pan once or twice while baking. Crust should be golden brown and filling will be bubble out. Allow to cool completely. Sprinkle with powdered sugar before serving.
Enjoy!
Recipe barely adapted from A Thought For Food
Tuesday, December 4, 2012
Drugstore Find: Chapstick
As much as I hate to admit it, I might be too old to be carrying around some Bonne Bell chapstick. With flavors (scents?) like Vanilla Frosting and Cotton Candy, it just doesn't say "I'm a young working professional with a salary and a savings account" (<< barely a savings account). So recently I decided to find an inexpensive replacement that was maybe a bit more age appropriate. Of course, the replacement I found was called "Baby Lips" so not sure if I accomplished that mission.
I've been using Maybelline's Baby Lips for a few months and I really bought it on a whim. I happened to be in a rush and ran to the drugstore to grab any chapstick I could find. Baby Lips was inexpensive (about $3-$4) so I chose a scent that included SPF and was on my way. I used it for a few weeks and really liked how well it moisturized and the slightest hint of gloss it provided. When that stick ran out, I stopped to get more but grabbed a different scent because I like a little spice in my life guys!
To my surprise, with the new stick, I realized the scents were actually a bit pigmented too. I'm making discoveries all over the place!

(P.S. Yes, I definitely have gold-speckled Formica countertops)
So I grabbed a few colors and I've been loving them all. They're actually quite a bit pigmented but not quite the commitment that lipstick can be. I have commitment issues with lipstick. I think it stems from my childhood.

I realize this picture makes it look like a crayon but I promise it's not. I would never recommend you use a crayon on your lips. Marker maybe, but never crayon.
So there ya' have it, a chapstick recommendation from someone completely unqualified to be providing beauty product recommendations. You're welcome.
Sunday, December 2, 2012
Pumpkin Bundt Cake

Perhaps I'm a toouucchhh late with a pumpkin bundt cake. It's ok right? Because you purchased crazy amounts of canned pumpkin in November too? Exactly, so we both have plenty of pumpkin to be used.

The great thing about bundt cakes is that they're as simple as mixing up a quick bread except they're baked in a crazy pan and voila! Gourmet. Cake with a hole in it.

On a slightly unrelated topic, don't try writing a blog post about Pumpkin Bundt Cake while watching The Holiday. I'll tell you what will happen. 1. You begin blog post at 8:30pm. 2. You type 12 words and then resume typing at 9:45pm. 3. You're appalled at how terrible Cameron Diaz is in this movie. 4. No really, how is she this terrible? 5. You're amazed at how charming Jude Law is despite being blonde and you don't really go for that. 6. You realize you've had your fingers on the keys for 75 minutes. 7. Continue watching The Holiday.

So yeah, this post has been a struggle. I do it all for my fans though. I just give and give and give. Totally selfless. You're welcome, guys. All I ask is you make this bundt cake in return. Or watch The Holiday. I'm sorry about Cameron Diaz.
Ingredients:
1 cup unsalted butter, softened
1 1/4 cups granulated sugar
3 eggs
2 1/4 cups all-purpose flour
2 teaspoons baking powder
1 teaspoon baking soda
2 tablespoons Pumpkin Pie Spice
1/2 teaspooon salt
1 1/4 cups canned pumpkin puree (not pie mix)
3/4 cup buttermilk
1/2 teaspoon vanilla extract
For the Icing 1/4 cup butter
1 cup powdered sugar
1 teaspoon vanilla extract
1-2 tablespoons milk (to reach desired consistency)
Instructions:
1. Preheat oven to 350°F. Butter or spray with a nonstick baking spray and flour a bundt pan. Set aside.
2. In a medium bowl, whisk together the flour, baking powder, baking soda, and pumpkin pie spice. In another bowl, whisk together the pumpkin, buttermilk, and vanilla until smooth.
3. In the bowl of an electric mixer fitted with the paddle attachment, beat the butter and sugar until light and fluffy, approximately 4 minutes. Add eggs and beat until combined.
4. Reduce speed to low and add flour and pumpkin mixtures, alternating so you begin and end with the flour. Mix just until incorporated.
5. Spoon batter into prepared pan and bake until a toothpick inserted into the center of the cake comes out clean, about 45-50 minutes. Cool cake in pan on a wire rack for 15 minutes, then invert rack over cake and reinvert cake onto rack. Allow cake to cool completely before icing.
For the icing: To make the icing, place butter in a small saucepan over medium heat, stirring occasionally until foam is gone and golden brown. There should be little brown bits beginning to form in the bottom of the pain and a nutty aroma will develop. Remove from heat and pour into a medium bowl. Stir in powdered sugar, vanilla, and milk (1 tablespoon at a time until desired consistency). Drizzle over cake. Garnish with sprinkles, if desired.
**A note: This cake is wonderfully moist and delicious. You can absolutely forgo the icing and it would still be delightful. But brown butter is delightful too.
Recipe barely adapted from Baker Girl.
Subscribe to:
Posts (Atom)